

1
Referrals/Free iPods Forum / How to put DVD into Windows Movie Maker and iMovie
« on: April 11, 2008, 02:25:10 AM »
If you want to edit a DVD movie with Windows Movie Maker or import several DVD clips into Mac iMovie to build a new DVD, but you get frustrated with the DVD format, this guide may help you solve the problem.
Before you get started, it will be helpful if you learn something about the DVD, WMM and iMovie.
General DVDs have CSS copy protection in MPEG-2 or VOB format.
(Windows) Windows Movie Maker supports WMV, AVI and MPG video files.
(Mac) iMovie accepts MOV and MPEG4 video files.
This guide includes three parts;
1. How to put DVD movie into Windows Movie Maker.
2. How to add DVD clips to Apple Mac iMovie
Tip: How to convert MSWMM file to other video formats.
Part1. How to put DVD movie into Windows Movie Maker
Step1. To put a DVD movie into Windows Movie Maker, you have to rip your DVD to WMV or AVI video first, and then you can load it into Windows Movie Maker. I’d prefer using Aimersoft DVD Ripper to do this. You can get this program at: http://www.aimersoft.com/dvd-ripper.html Then install and run it, put your DVD disc into your DVD drive, click “Load DVD†to locate your DVD file and import it, or load it by clicking “Load File†to add DVD IFO file. (This DVD Ripper can rip copyright protected DVD movies, but you should remember that it’s illegal rip DVD for any business purposes)
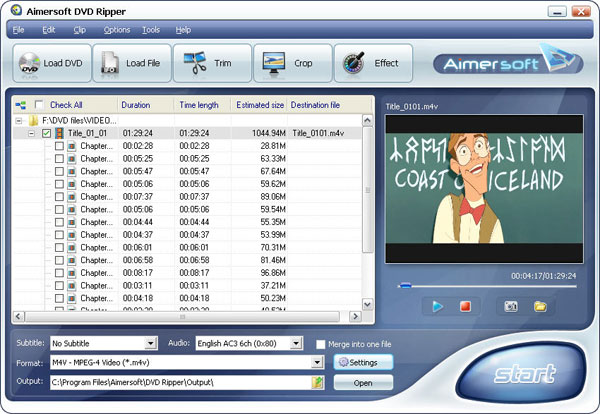
Step2. Select output format and subtitle
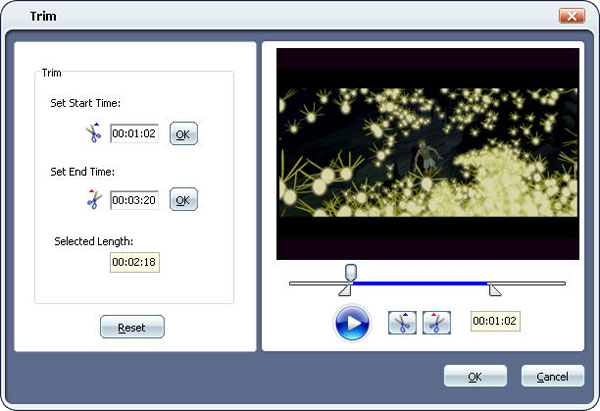
After you load the DVD files, click the format drop-down list to select “WMV …quot; Windows Media Video (*.wmv)†or “AVI …quot; Audio Video Interleaved (*.avi)†as the output format. A regular DVD movie has multiple subtitles and audio tracks, and you can select the right one for you. If you just want a certain part of the DVD movie, you can click “trim†to cut the DVD movie. Just drag the timeline bar to set the start and end time, and then blue line will be the captured parts.
For advanced user, if you want to output higher quality video, click the “Settings†button to open the panel, here you can customize video bitrate, audio bitrate, resolution, framerate, etc. Higher bitrate will result in bigger file size.
Step3. Start to convert
After the above steps, you just need to click “Start†and wait for the conversion to be finished. It takes about 40 minutes to convert a common two hours DVD movie.
Step4. Edit DVD with Windows Movie Maker (optional)
Run Windows Movie Maker, in the “Movie Task†bar, click “Add Video†to browse your computer and located the converted files, and then you can start to make personal movies.
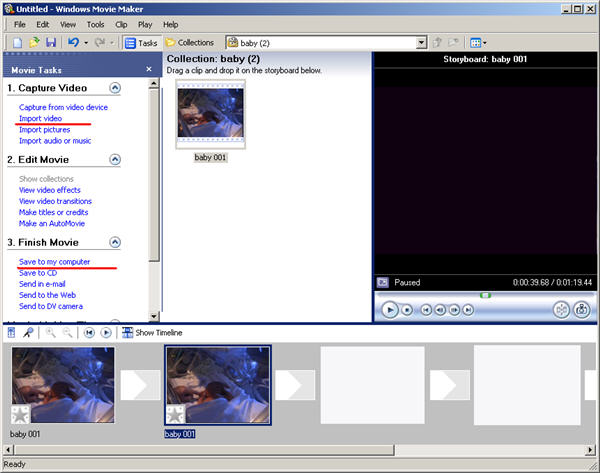
Tips: Many users may wonder how they can convert Windows Movie Maker file (*.MSWMM) to other video format. Actually, A *.MSWMM file is not a video file. It is a project file of Movie Maker (more like a record file). You have to open this file in Windows Movie Maker and save the movie to your computer: Go to Movie Tasks bar > Finish Movie > Save to my computer. After that you will have a WMV file which can be converted to another video format or burned to DVD.
Part2. How to add DVD clips into Apple iMovie
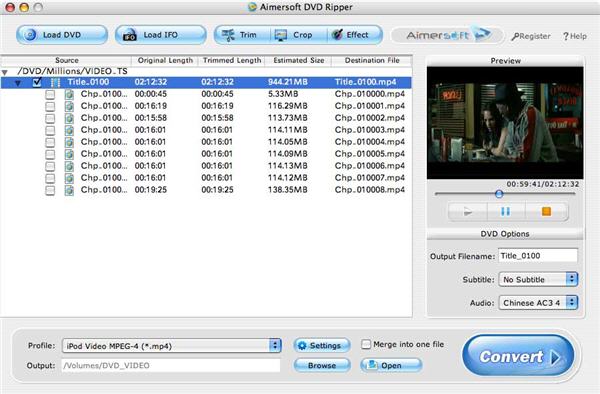
iMovie is similar to Windows Movie Maker, it supports MOV and MP4 video, so you just need to convert your DVD movie to the right format. Aimersoft DVD Ripper has a Mac Version which supports both Mac OS Tiger and Leopard; you can download it for free from here:
http://www.aimersoft.com/dvd-ripper-for-mac.html
The operation steps are similar to the windows version, so I will not bother to repeat everything here.
When the conversion is finished, you can run the iMovie, build a new project, and then drag the converted files to the work space to make personal files.

When the task is finished, In the Menu bar, Click "File" -> "Export" and save it as QuickTime video, then you can convert it to other video format or burn it to DVD. If you need detailed info, here is a [URL="
Before you get started, it will be helpful if you learn something about the DVD, WMM and iMovie.
General DVDs have CSS copy protection in MPEG-2 or VOB format.
(Windows) Windows Movie Maker supports WMV, AVI and MPG video files.
(Mac) iMovie accepts MOV and MPEG4 video files.
This guide includes three parts;
1. How to put DVD movie into Windows Movie Maker.
2. How to add DVD clips to Apple Mac iMovie
Tip: How to convert MSWMM file to other video formats.
Part1. How to put DVD movie into Windows Movie Maker
Step1. To put a DVD movie into Windows Movie Maker, you have to rip your DVD to WMV or AVI video first, and then you can load it into Windows Movie Maker. I’d prefer using Aimersoft DVD Ripper to do this. You can get this program at: http://www.aimersoft.com/dvd-ripper.html Then install and run it, put your DVD disc into your DVD drive, click “Load DVD†to locate your DVD file and import it, or load it by clicking “Load File†to add DVD IFO file. (This DVD Ripper can rip copyright protected DVD movies, but you should remember that it’s illegal rip DVD for any business purposes)
Step2. Select output format and subtitle
After you load the DVD files, click the format drop-down list to select “WMV …quot; Windows Media Video (*.wmv)†or “AVI …quot; Audio Video Interleaved (*.avi)†as the output format. A regular DVD movie has multiple subtitles and audio tracks, and you can select the right one for you. If you just want a certain part of the DVD movie, you can click “trim†to cut the DVD movie. Just drag the timeline bar to set the start and end time, and then blue line will be the captured parts.
For advanced user, if you want to output higher quality video, click the “Settings†button to open the panel, here you can customize video bitrate, audio bitrate, resolution, framerate, etc. Higher bitrate will result in bigger file size.
Step3. Start to convert
After the above steps, you just need to click “Start†and wait for the conversion to be finished. It takes about 40 minutes to convert a common two hours DVD movie.
Step4. Edit DVD with Windows Movie Maker (optional)
Run Windows Movie Maker, in the “Movie Task†bar, click “Add Video†to browse your computer and located the converted files, and then you can start to make personal movies.
Tips: Many users may wonder how they can convert Windows Movie Maker file (*.MSWMM) to other video format. Actually, A *.MSWMM file is not a video file. It is a project file of Movie Maker (more like a record file). You have to open this file in Windows Movie Maker and save the movie to your computer: Go to Movie Tasks bar > Finish Movie > Save to my computer. After that you will have a WMV file which can be converted to another video format or burned to DVD.
Part2. How to add DVD clips into Apple iMovie
iMovie is similar to Windows Movie Maker, it supports MOV and MP4 video, so you just need to convert your DVD movie to the right format. Aimersoft DVD Ripper has a Mac Version which supports both Mac OS Tiger and Leopard; you can download it for free from here:
http://www.aimersoft.com/dvd-ripper-for-mac.html
The operation steps are similar to the windows version, so I will not bother to repeat everything here.
When the conversion is finished, you can run the iMovie, build a new project, and then drag the converted files to the work space to make personal files.
When the task is finished, In the Menu bar, Click "File" -> "Export" and save it as QuickTime video, then you can convert it to other video format or burn it to DVD. If you need detailed info, here is a [URL="


